How do you give a wooden piece of furniture a makeover?
In this article, I explain the steps to follow and the products I used to transform this piece of wooden furniture. I saw a lot of potential in this coffee table, and it was exactly what I was looking for. I’m happy to say she’s finally found her place with us.
First, let’s take a look at the products I used.
List of products
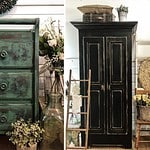
- Colorantic chalk paint: Cotton ball
- Clear glaze, Colorantic translucent window
- Angled natural bristle brush 1½” – 38 mm Colorantic
- Red cabaret set with handle and two Colorantic velvet-finish foam rollers
- Pine lath (1″ x 4″) for my table top
- Minwax pine stain
- PL construction glue to ensure that the wood battens don’t come unstuck in the long term.
Preparation
The wooden furniture I bought had already been painted with acrylic paint.
- I cleaned the furniture with a damp cloth and some mild soap and left it to dry.
The paint
- I applied a first coat of paint, Cotton ball. Since the table’s original color was navy blue, I had to give it a third coat of paint, even though Colorantic chalk paint gives great coverage.
- Allow to dry between coats. Take care that Colorantic chalk paint dries within about 30 minutes. This time may vary according to the humidity level in the room or outdoors.
The finish
- Once the paint was completely dry, I applied the clear glaze, Translucent Window as a finish. The glaze gives a satin finish, I was afraid this finish would be too glossy, but in the end it’s just perfect!
This completes the steps taken to upgrade the base of my furniture.
See below for the next steps in adding the pine boards to the top of my coffee table.
Table top
- I went to Rona to buy seven 1″ x 4″ x 4′ pine boards.
- I then bought Minwax stain to dye the boards.
- When I got home, I sanded the boards with 120-grit paper and finished with 180-grit, since I used an oil-based stain.
- Once the sanding was complete, I applied a coat of Minwax Wood Conditioner to the wood to allow the stain to penetrate evenly without staining. I let it dry before continuing.
- I then applied the stain with a cloth, without letting it penetrate for too long. I didn’t want my wood to be too dark. I wiped off the excess stain with a new clean cloth and let it dry thoroughly.
- Then I applied Polyurethane…a clear finish that will protect and beautify the wood.
The finish
- I waited 12 hours before moving on to the last step, gluing the boards to the top of my table.
- I glued the boards with PL glue. I really wanted to make sure they stayed in place. I then used clamps to hold the wooden battens in place once glued.
I’m really proud of the result! Within 12 hours I had a new coffee table.
Depending on my tastes and needs, I now have a unique coffee table that I won’t find in everyone else’s living room… and at very little cost.

MARTINE MORIN
Joy of M
Influencer
Join our English Colorantic group
Subscribe to our newsletter:
Newsletter
Facebook
Instagram
Pinterest
Etsy
Amazon Canada
YouTube
Tiktok
Related Posts