How to Restore a Plant Pot with Colorantic Chalk Paint
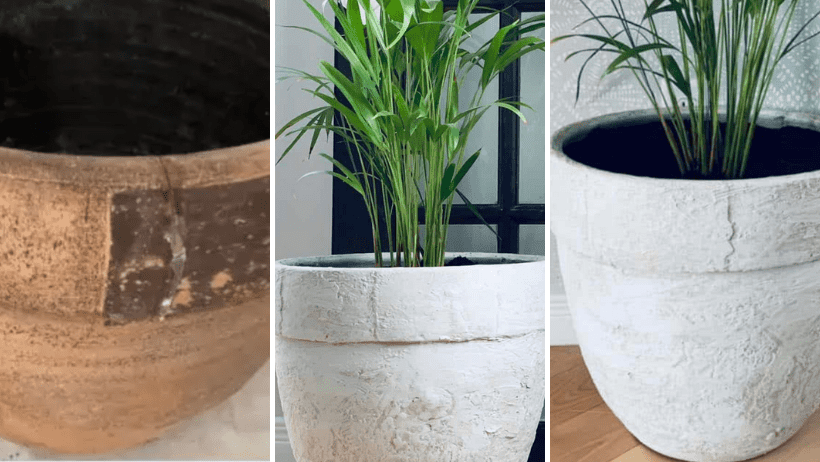
One of my neighbours had this plant pot on her balcony. It was cracked and was chipping away everywhere. I imagine a few years ago it was beautiful, but that was no longer the case. No one wanted this pot now except me, who saw its full potential. I like to give a second life to a piece of furniture or other objects and this plant pot deserved to be rejuvenated, I decided to restore this plant pot. A project that I loved creating and was very simple to do.
How do you restore a plant pot? There’s only one rule for sprucing up an old plant pot and it is to have fun! I had fun with this little project and it only took me a few hours to complete. This is a great starter project for learning how to use Colorantic chalk paints. Choose a colour that matches your decor and let your imagination run wild. I loved creating texture with the plaster. In addition to making it more resistant, it created an interesting visual.
Here are the steps to restore any plant pot.

List of Products Used
- Fast-Drying Plaster
- Colorantic Chalk Paint Cotton ball
- Leftover paint lying around in the back of the garage
- Natural Beeswax
Preparation
To restore a plant pot, firstly, we must use plaster to repair and solidify the structure. Then a little sanding of the plaster and the pot is necessary. Importantly, the plaster should be spread with rubber gloves to protect your hands. Wait several minutes and let everything dry completely.

The Steps to Follow
Secondly, have fun with whatever colours you choose. In this case I used the Colorantic Cotton Ball chalk paint. I made a small mixture with leftover chalk paint colours that I had on hand. Don’t be afraid to mix different colours of Colorantic paint to create new colours. This gives a totally unique and original colour.
In the last step, we finish with natural beeswax which will serve as a good protection. Be aware that natural beeswax takes several days to dry and must be spread in a very thin layer. The texture can be sticky, if you put too much on, I suggest you remove the excess with a white cotton cloth, t-shirt style.
To Finish
I tell you, all those who had the chance to see my plant pot in real life, really liked the final result! It is impressive and quite beautiful. It was a great success. Colorantic products can easily be used on all surfaces. It is perfect for restoring and giving a second life to any plant pot. This chalk paint gives an interesting matte and vintage look. Plus, the paint’s creamy texture is easy to spread and often covers completely with the first coat.

In Conclusion
So now that you know how to restore a plant pot with Colorantic chalk paint, have fun rejuvenating your decor however you like! A little paint on your flower pots can completely change the design of a room. Plus, it’s a fun, simple, and easy project to complete! Like me, you will love the result.
If you want even more ideas for upgrading furniture, you can join our Facebook group or follow our publications on various online platforms.
Jour our Colorantic English Facebook Group
Follow Us on Social Media:
Newsletter
Facebook
Instagram
Pinterest
Etsy
Amazon Canada
YouTube
Tiktok


