Comment peindre un buffet de style années 50?
J’ai longuement recherché le petit meuble qui ajouterait une touche d’originalité à cette cuisine de style champêtre. Je n’avais pas vraiment de style particulier étant donné que, quel que soit le style de meuble ou accessoire décoratif, il est possible de leur donner une apparence complètement différente seulement en les peignant, je cherchais surtout des éléments originaux.
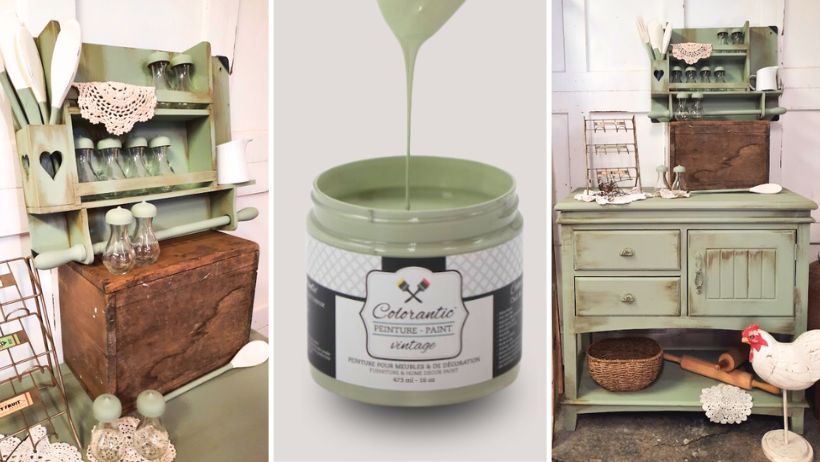
Je suis tombée sous le charme de ce petit buffet et de cette petite étagère. En les apercevant, j’ai immédiatement su que j’allais en faire un ensemble décoratif très original.
Je suis très inspirée par toutes ces belles teintes claires et colorées d’une autre époque. Pour donner le style ancien que je recherchais à mes nouvelles trouvailles, la très belle couleur, Sauge, de Colorantic était parfaite. Ce vert doux et profond rappelle les très belles teintes chaleureuses d’antan.
En continuant à lire, vous découvrirez les produits que j’ai utilisés et je vais vous expliquer une à une les étapes que j’ai exécutées pour la réalisation de ce projet.
Les produits à prévoir pour donner ce style à un meuble

Première étape: préparer les surfaces
La première étape, qui soit dit en passant, la plus importante pour un travail de longue durée, est sans aucun doute un très bon nettoyage, ceci dans le but de retirer toutes traces de saleté et de graisse.
J’ai vaporisé le nettoyant et démaquillant à vernis sur toutes les surfaces et je l’ai laissé agir durant une trentaine de minutes. Durant le temps de repos, j’ai vaporisé à nouveau du nettoyant.
![]()
Une fois le temps écoulé, à l’aide d’un chiffon humecté d’eau chaude, j’ai très bien rincé à deux reprises en m’assurant de très bien retirer tous les résidus. Cette étape est également très importante pour ainsi permettre à la peinture de très bien adhérer.
Une fois le nettoyage terminé, j’ai sablé légèrement toutes les surfaces, car ceci permet également à la peinture de mieux adhérer. Étant donné que ce meuble avait été anciennement verni à l’huile, j’ai appliqué de l’apprêt à l’huile pour me permettre de faire la transition entre l’ancien fini à l’huile et la nouvelle peinture acrylique.

Deuxième étape: appliquer des couleurs
Après le temps de séchage de l’apprêt, j’étais prête à passer à l’étape la plus excitante du projet. J’ai donc appliqué la magnifique couleur, Sauge, sur le meuble, l’étagère et tous les accessoires. Pour le buffet, j’ai utilisé le pinceau ovale #10 pour les grandes surfaces ainsi que le pinceau, Blanche-Neige, pour les angles et les endroits qui nécessitaient plus de précision.
Pour la très originale étagère à épices et les petits accessoires, j’ai opté pour le pinceau oval #10 également et cela fut un très bon choix.
J’ai utilisé la couleur, Boule de coton, uniquement pour peindre une partie des ustensiles qui servent uniquement à décorer l’étagère.
Que ce soit pour la couleur, Sauge ou Boule de coton, deux couches de peinture ont été largement suffisantes.

Troisième étape: la touche finale
Lorsque la peinture fut bien sèche, et avant d’appliquer la cire Naturelle d’abeille, j’ai sablé légèrement toutes les surfaces en utilisant le côté doux du bloc de sablage. Personnellement je trouve que ceci adoucit la peinture et me permet d’appliquer la cire plus facilement.
En utilisant le pinceau XL, sur une petite surface à la fois, j’ai appliqué la cire Naturelle d’abeille. Une fois la cire appliquée, je prenais soin de bien la polir en utilisant les essuie-tout. J’ai recommencé ces étapes pour toutes les surfaces en changeant régulièrement d’essuie-tout.
Après avoir terminé d’appliquer la cire Naturelle d’abeille, et afin de donner l’aspect vintage souhaité, j’ai opté pour la cire Brune antique.
Je l’ai appliquée sur les coins, les angles et les rebords. Cette couleur se marie parfaitement avec la couleur Sauge, elle apporte de la richesse et de la profondeur aux endroits désirés et aux éléments décoratifs.
Ce petit buffet hors de l’ordinaire apporte un style tout particulier à la cuisine de style champêtre.Il faut savoir oser en décoration, car ce sont ces petites touches particulièrement originales qui font toute la différence à notre déco.
Finalement, j’ai obtenu exactement l’effet que je désirais ! Je suis très heureuse du résultat final.

Claire Gendron
Bloggueuse
Rejoignez notre groupe francophone Colorantic
Inscrivez-vous à notre:
Infolettre
Facebook
Instagram
Pinterest
Etsy
Amazon Canada
YouTube
Tiktok
Related Posts


