How to Transform a Kitchen Cabinet into a Mini-Bar
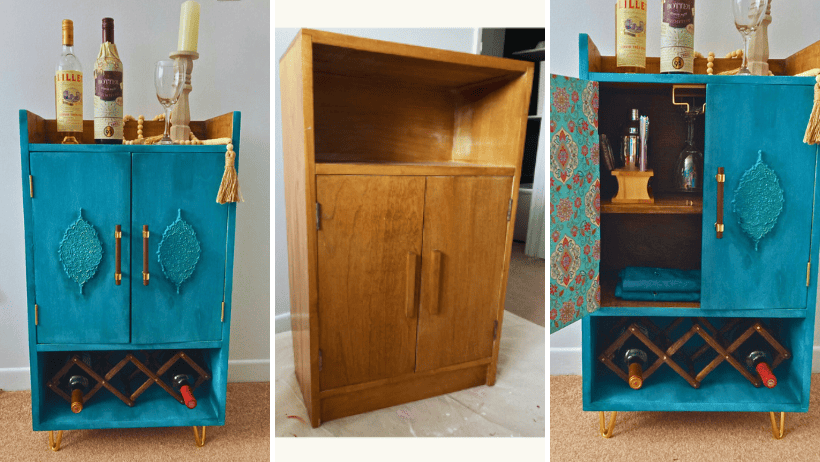
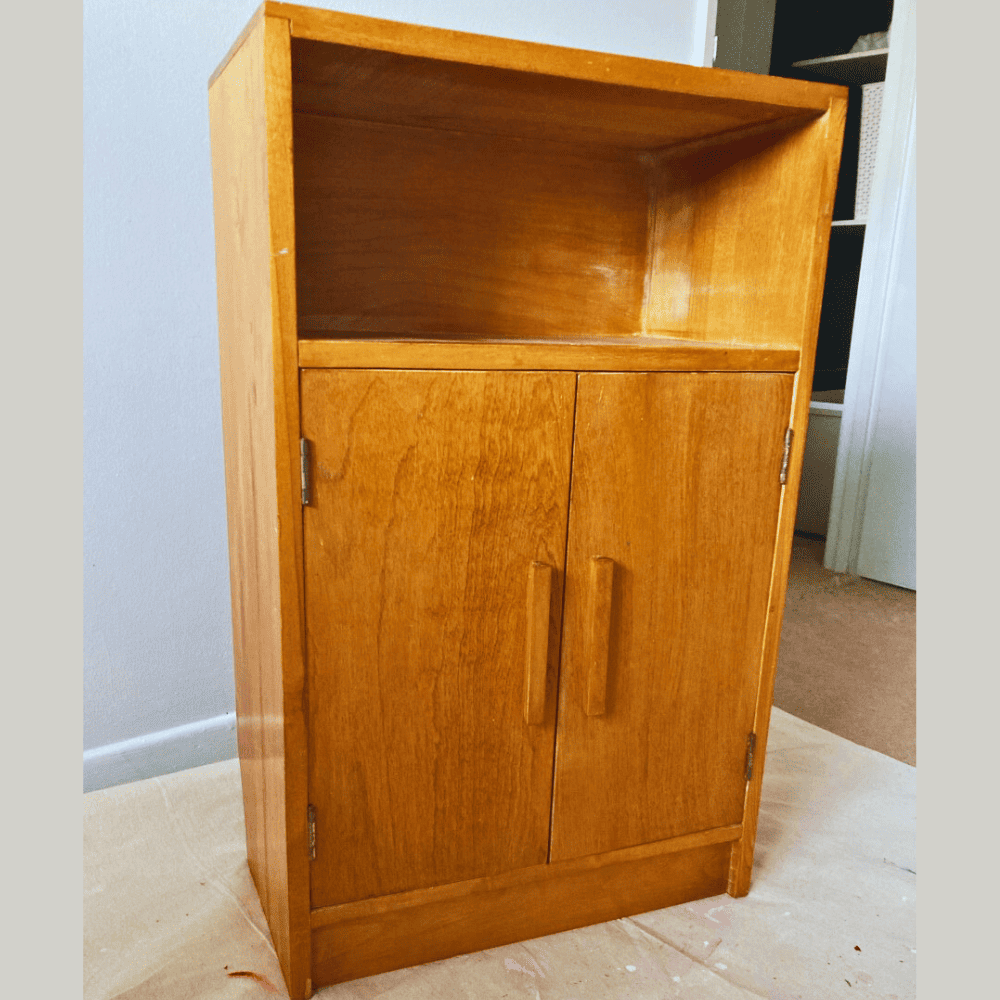
From the cabinet to the bar… I picked up this solid wood cabinet and had the idea of making it into a small mini-bar cart for my niece. What a great idea for upcycling furniture. I love being creative and giving furniture a second life.
![]()
List of products used:
- Colorantic Cleaner and Varnish Remover
- Colorantic Mermaid Chalk-Based Paint
- Colorantic Caribbean Sea Chalk-Based Paint
- Colorantic Cactus Chalk-Based Paint
- Colorantic Charcoal Black Wax
- Colorantic Gold Bar Wax
- Colorantic Matte Varnish
- Colorantic Tangerine Granular Soap
- Colorantic Oval 35 mm Brush
- Colorantic Sanding Block
- Gel Dye
- Water Spray Bottle
- Tissue Paper
- Resin Moulds
- Blue Shop Towels

![]()
Here are the steps to transform a cabinet into a mini-bar.
Preparation
This is the most important step and not to be overlooked, cleaning. First, it’s always best to deep clean your furniture to make sure grease, grime and dirt are gone. Now you can take a closer look at your piece.
In this case, part of the back was missing, so something a little more than wood filler will be needed. I used a putty that I separated into two parts to fill the back of the cabinet. Did I mention this piece of furniture needs a little love? I also decided to flip this piece upside down. It’s a good idea to turn the furniture upside down, it can give a completely different look, a new style. Try it if possible, it makes your room even more unique. If I flip it over, that means moving the front plate backwards to create a little nook on top. The hinge on one side was loose, so I removed the screws and added little bits of toothpick. This way I put the hinge back in place. Toothpick bits help hold the screw.
Then I sanded the whole piece, nice and smooth, because I’m going to stain part of it a walnut brown colour. Then I will paint the other part with the Colorantic chalk-based paint colours I have chosen for this project.
I had to be particularly careful on top, because this part was never finished and was quite rough. I painted the interior of the cabinet as well as the upper part in a walnut colour. Once dry, I put 2 coats of varnish on it. Once it was all dry, I protected the areas with brown paper and masking tape. At the transition line, I put a thin topcoat on the edge of the tape, to ensure a clean, straight line.
The Steps to Follow:
I put a base coat on first, because it is pine and it runs. I then added a resin mould on each of the doors.
For the paint, I applied the base colour, which is a 1:1 ratio of the Caribbean Sea colour and the Mermaid colour. Light sanding with very heavy sandpaper (wet is a good option with black sandpaper) is required between the 2 coats to ensure a smooth finish. Now, for a bit of originality and uniqueness, I used a 1:2:3 ratio of the Caribbean Sea colour, Cactus colour as well as the Mermaid shade. This will help create some dimension and some depth.
I put an extremely thin layer and using water in my sprayer bottle, to make the colour a little more translucent. Doing it on my base colour helped the colour show through. I cut out the interior part of the doors to add even more dimension. Then I sealed the painted part with 2 coats of matte varnish, sanding again between each coat.
![]()
To Finish
Now let’s get to the final touches. I added new table legs to the cabinet. I liked this mini-bar, but it needed a little something to give it a more weathered look. I grabbed the Charcoal Black wax from Colorantic and applied it to the areas to give it a worn/aged feel. Waxes create an antique, vintage effect.

In Conclusion
This mini-bar is loved. A restoration project idea that I found to not always be easy because this cabinet was in dire need of repair. But all in all, it was pretty easy to do. It is a very unique upgrade and I am very proud of it.
By donating a piece of furniture rather than throwing it away, you allow it to have a second life. At the same time, you avoid cluttering the recycling centers with objects that can still be used. This is both good for the environment and for society! Create new with old and have fun with Colorantic products, there are so many possibilities.
If you want even more ideas for upgrading furniture, you can join our Facebook group or follow our publications on the various online platforms.
Join our Colorantic English Facebook group
Follow Us on Social Media:
Infolettre
Facebook
Instagram
Pinterest
Etsy
Amazon Canada
YouTube
Tiktok
Related Posts