Enhance a Chest of Drawers with a 3D Effect
Discovery and preparation
Enhance a chest of drawers with a 3D effect is an interesting way to personalize and add character to your furniture.
Sometimes it takes a lot of searching before you find the rare gem that is just right for you. We make great finds scouring second-hand sites or browsing garage sales, and sometimes even find them on the side of the road. After several weeks of searching, I finally found a magnificent chest of drawers for the modest sum of $35. Apart from its harsh colour, it was exactly the style I was looking for to furnish my room.
I had heard about using a 3D effect to add a touch of femininity to a piece of furniture. After doing a bit of research, and feeling confident, I decided to apply this technique to my new chest of drawers.
This is a project I loved working on, and which taught me how to enhance a chest of drawers with a few decorative elements.

List of Products Used:
- Colorantic Cleaner and Varnish Remover
- Colorantic Oil-Based Primer
- Colorantic Chalk-Baed Paint: Ballerina
- Colorantic Chalk Based Paint: Peony (clearance colour)
- Colorantic Natural Beeswax
- Colorantic Foam Roller
- Colorantic Purple Synthetic Oval Brush #6
- Colorantic Snow White Brush
- Colorantic Sanding Block
- Silicone mold
- Extra-strong glue
- Paper towels
- Casting resin

Preparation
The most important step before starting the project was cleaning. So I deep-cleaned the piece inside and out using Colorantic’s Cleaner and Varnish Remover.
I sprayed the cleaner on all surfaces and let it sit for 30 minutes. During the resting period, I sprayed twice. After 30 minutes I soaked a cloth in very hot water, wrung it out well and wiped all surfaces to remove any residue. I rinsed a second time to make sure there was no cleaner left.
Next, I quickly sanded to scratch with 120-grit sandpaper, then wiped again to remove the dust. I had to repair a few places with wood filler. I then sanded those specific areas, making sure to remove the dust.
![]()
Before starting to paint, I removed the handles. It’s important to remove the hardware that you don’t want to paint. Good preparation is surely the least interesting step, but undoubtedly the most important, as it ensures long-lasting, durable work.
For this piece, I had to apply two coats of Colorantic’s oil-based, all-purpose primer. I lightly sanded the surface between coats with 120-grit sandpaper and made sure to remove all dust.
Now, Onto the Best Part
First, I applied two coats of Ballerina colour chalk-based paint. I chose to sand between coats of paint to soften the brushstrokes and achieve a smoother finish. It is very important to always dust well between sanding operations. As this chalk-based paint dries very quickly, you don’t have to wait long between coats.
The colour I chose is perfect for the delicate style of the chest.
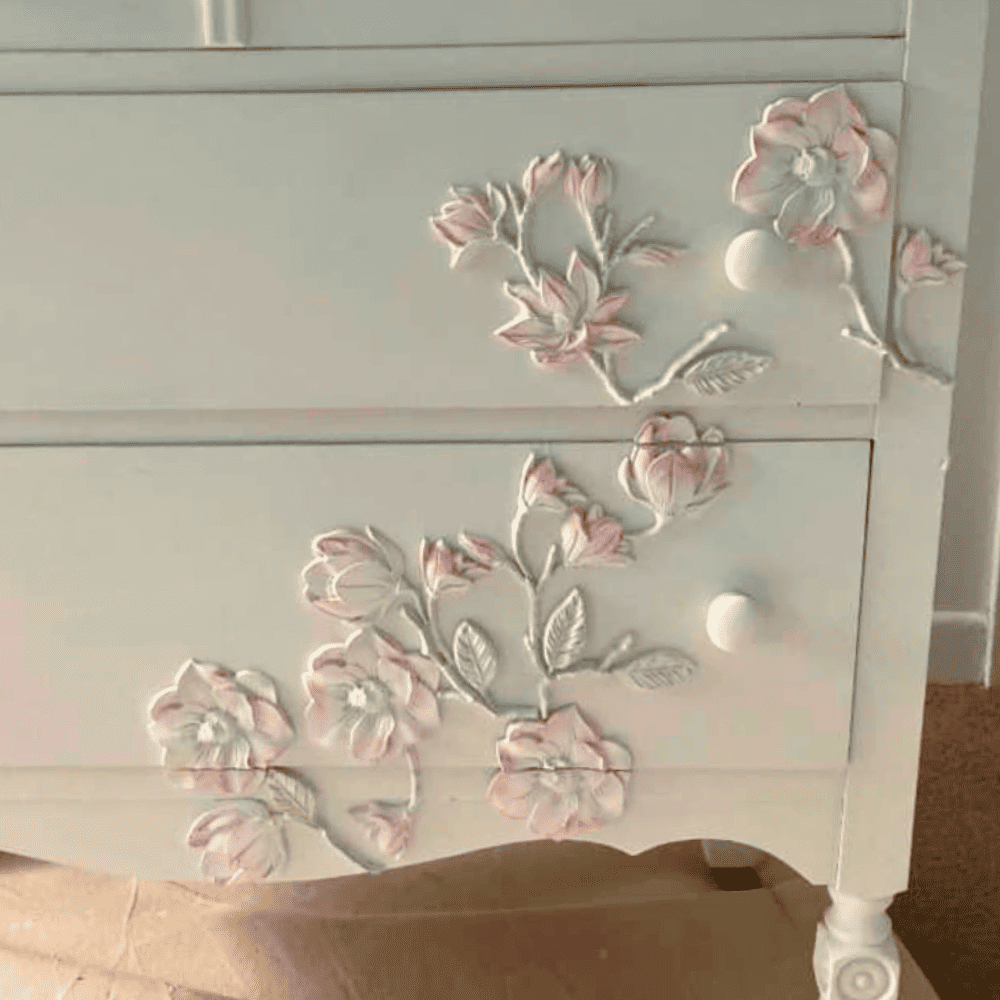
Once the paint had dried, I placed the chest on its back, leaving the drawers inside, to make it easier to place my resin flowers.
At the same time, I made a batch of resin flowers in silicone moulds, for which you will find instructions in the box and which are very easy to create. Once the flowers were finished, I decided where to place them.
Once I’d found the right spot, I fixed everything in place using strong glue.
As I only had two moulds, I made more flowers by filling my moulds with resin again. If the flowers are partly on the drawers, to give them a consistent look when we open and close the drawers, we need to cut them.
When the flowers were very well set, I also used the colour, Ballerina, to paint them.
Once the work was finished, I wasn’t entirely satisfied; I felt there was a little something missing!
I decided to make the flowers stand out even more, by drybrushing them with the colour Peony. Finally, I finished and sealed the project by applying Colorantic’s natural beeswax.
Instead of the original handles, I opted for wooden handles that I also painted with the colour Ballerina.
In Conclusion
For my first project with a 3D effect, I am really proud of the result. You need to let your imagination run wild and trust yourself.
If you get stuck, you can always start again!
Don’t forget that you can ask the experts at Colorantic any questions you may have.
For more decorating ideas, join our group Trucs/Décos en tout genre.
https://www.facebook.com/groups/338742056331286
Join Colorantic’s English-speaking group

Join our English Colorantic group
Subscribe to our newsletter:
Newsletter
Facebook
Instagram
Pinterest
Etsy
Amazon Canada
YouTube
Tiktok
Related Posts