How to Paint a 1950s Style Buffet?
I spent a long time searching for the perfect piece of furniture that would add a touch of originality to this rustic-style kitchen. I didn’t really have a specific style in mind since, regardless of the style of furniture or decorative accessory, it’s possible to completely transform their appearance just by painting them; I was primarily searching for unique elements.
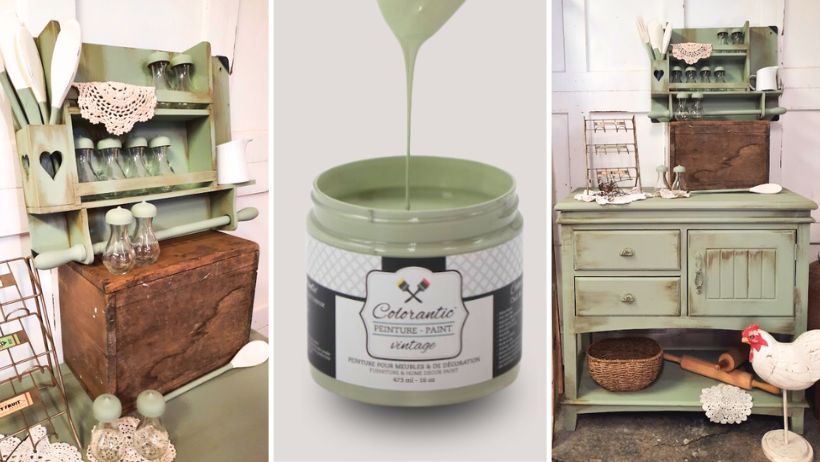
I fell in love with this little buffet and shelving unit. Upon seeing them, I immediately knew I would create a very original decorative set.
I am very inspired by all these beautiful light and colorful shades from another era. To give the vintage style I was looking for in my new finds, the very beautiful color, Sage, from Colorantic was perfect. This soft, deep green recalls the very beautiful warm shades of the yesteryear.
As you continue reading, you will discover the products I used, and I will explain to you step by step the process I followed to carry out this project.

First Step: Preparing the Surfaces
The first step, which is by the way the most important for long-lasting results, is undoubtedly a thorough cleaning to remove all traces of dirt and grease.
I sprayed the varnish cleaner and remover on all surfaces and let it sit for about thirty minutes. During the resting time, I sprayed the cleaner once more.
Once the resting time was over, using a warm damp cloth, I wiped very thoroughly twice, ensuring to remove all residues. This step is also very important to allow the paint to adhere very well.
After the cleaning was completed, I lightly sanded all surfaces, as this also helps the paint adhere better. Since this piece of furniture had previously been varnished with oil, I applied oil primer to allow me to transition between the old oil finish and the new acrylic paint.

Second Step: Applying Colors
After the primer had dried, I was ready to move on to the most exciting step of the project. I applied the beautiful Sage color to the furniture, shelf, and all accessories. For the buffet, I used the oval brush #10 for larger surfaces and the Snow White brush for corners and areas requiring more precision.
For the unique spice shelf and small accessories, I also opted for the oval brush #10, which turned out to be a great choice.
I used the Cotton Ball color only to paint a portion of the utensils that are solely for decorating the shelf. Whether it was the Sage or Cotton Ball color, two coats of paint was more than sufficient.

Third Step: Final Touches
Once the paint was completely dry, and before applying the Natural Beeswax wax, I lightly sanded all surfaces using the soft side of the sanding block. Personally, I find that this softens the paint and allows me to apply the wax more easily.
Using the XL brush, on a small area at a time, I applied the Natural Beeswax. Once the wax was applied, I made sure to polish it well using the paper towels. I repeated these steps for all surfaces, regularly changing the paper towels.
After finishing applying the Natural Beeswax, and to achieve the desired vintage look, I opted for the Antique Brown wax.
I applied it to the corners and edges. That color complemented the Sage color perfectly, adding richness and depth to the desired areas and decorative elements.

Final touches
This unique little buffet brings a distinctive style to any rustic kitchen.
In decorating, it’s important to dare to be different, since it’s these particularly original touches that make all the difference in our decor.
Ultimately, I achieved exactly the effect I desired! I am very pleased with the final result.
Claire Gendron
Blogger
Join our English Colorantic group
Subscribe to our newsletter:
Newsletter
Facebook
Instagram
Pinterest
Etsy
Amazon Canada
YouTube
Tiktok
Related Posts